This was a game fought at the Struggle of Nations Team event at the League of Ancients in Melbourne in September 2023. 1813 Armies only – Coalition armies vs Empire armies. This battle proved to be a real clash of the titans with my Prussians fielding two units of tooled up large Grenadiers taking on my opponent’s division of Superior Veteran Old Guard!
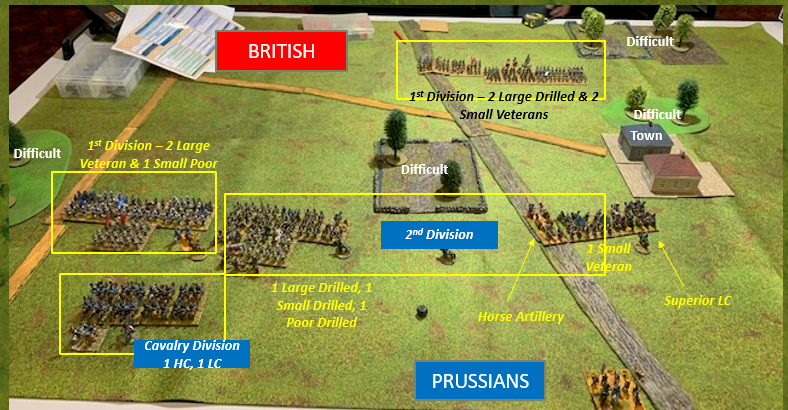
This pic shows the terrain and initial deployment (Prussians are the blue blocks). A very open battlefield with only an enclosed field and village in the French deployment area playing any role in proceedings. We both chose Frontal Assault for our strategies. I won the subsequent dice off and chose to Attack which was a tough decision as my army is only 3 divisions and I knew his was 4 (having loaned him the figures! :)) Because the Attacker must deploy the first division when choosing Frontal Assault this meant he would still have 2 divisions to deploy when I’d already put my whole army down. But I wanted to move first. Time would tell if this was a wise decision or not.
French Army list – 242 points in 2 units of Old Guard!

There’s a small anomaly in the points here as Veteran artillery attachments are now a thing of the past.
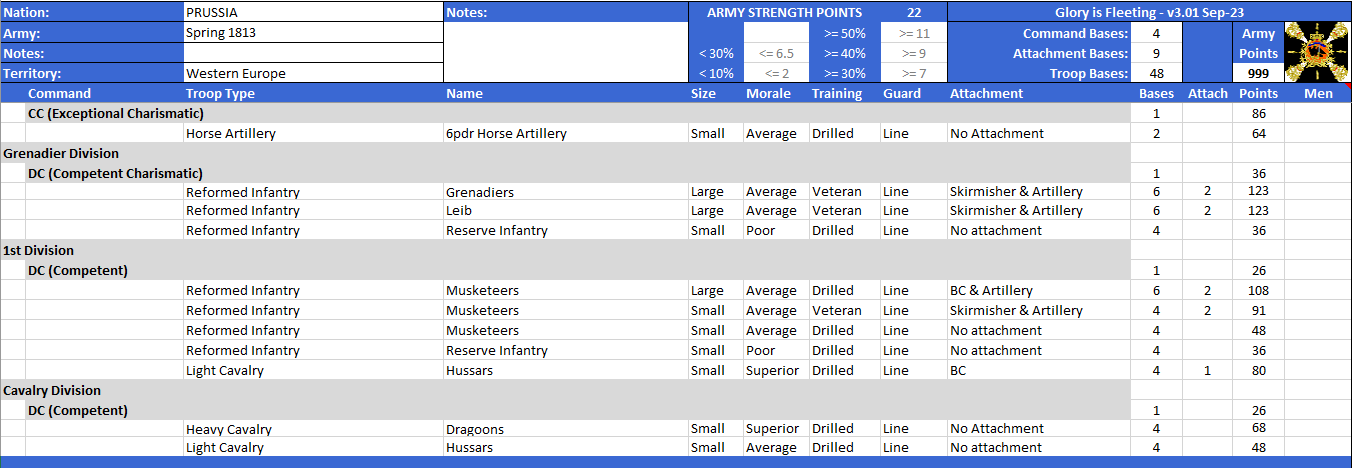
Prussian Army list – 246 points in 2 Large units of Grenadiers!
Prussian Turn 1

The Grenadiers 1 have force marched on the left (i.e. triple moved). The left hand unit wobbled in their morale check but their Charismatic general gave them a good talking to and they rallied in the End Phase. Why the Force March? We want to pin the French in place as they seem to have hemmed themselves into a narrow space between the village and the field and we might be able to stop them getting their cavalry into action. The Poor Reserve infantry 2 are moving up behind the Veterans but force marching isn’t for Poor troops! The French flank looks potentially open on that side. Maybe the Reserve infantry can take advantage?
Over on the right, the Superior Hussars 3 have moved forward to slow down the French advance on that flank, while the 1st Division 4 in the centre is holding back slightly to see what the Old Guard do. The Horse Artillery 5 didn’t need to force march as their extra movement distance allows them to almost keep up with the Force Marching Grenadiers.
Meanwhile a unit of Hussars 6 from the Cavalry Division has moved up in support of the Grenadiers to help with skirmisher clearing while the Superior Dragoons 7 are waiting in reserve at the back.y
French Turn 1

A wide angle view of the battlefield to be able to show a unit of pesky French hussars circled in red who have double moved to threaten the Prussian right flank. Their 2nd Division infantry A have pushed up into the face of my Hussars but with only a single gun attachment in that force, should we be worried? That being said, that looks like a lot of French bearing down on my open right flank!
The Old Guard B have advanced in the centre to bring one Prussian Grenadier unit into range of both their units. However, the French 1st Division C seems a bit unsure what to do and is holding back (maybe feeling the threat of those awesome Poor Prussian Reserve infantry loitering out on my left?).
The French cavalry Division D are feeling the pressure of the confined space they’ve been deployed in and haven’t really moved. The unit in column on the road getting in the way of the heavy artillery who are trying to deploy. (I seldom find deploying in column worthwhile as the movement bonus on road is usually lost in the time it takes to change formation).
Prussian Turn 2

The Grenadiers 1 took some skirmish hits from the Old Guard but these were cleared by the Hussars. They’ve decided not to advance alone against the Old Guard so instead shifted a base to the right to bring both units in shooting range of the Guard. The Poor Reserve infantry 2 have double moved up the left flank. They don’t want to get too far forward but could potentially draw off a French unit.
The horse artillery 3 have unlimbered in front of the Guard.
The large unit 4 with Artillery and Brilliant Commander are facing up against the Old Guard and the French Heavy Battery in the centre while the small unit of Veterans on their right are bravely facing off against the entire French 2nd Division. The Prussian Hussars 5 on the right passed a Command Test to move away from the French infantry (which also requires a morale test as you’re retreating from enemy within 6 inches – but we passed that too!) A unit of Prussian Musketeers 6 can be seen moving to the right as well to prop up that exposed flank. The unit of Poor Reserve infantry 7 on that flank are loitering to the rear, a good place for Poor infantry!
The Prussian Dragoons 8 have wheeled to the right flank too. Potentially with 2 cavalry units to one, we can overwhelm the French hussars and turn that flank too while the French cavalry are stuck at the back? However, my Cavalry Division is horribly stretched with one unit on either flank and only a Competent commander to control them. Perhaps I’m being too ambitious…
French Turn 2 and Prussian Turn 3

The battle line is starting to take shape! The French 1st division A finally realised it needed to come out of the field, perhaps under encouragement from the French Guard who fancied some support. This has left their flank exposed to the Prussian Reserve infantry 1 who’ve double moved around the open flank. Even Poor troops don’t mind fighting against a flank! The Prussian hussars 2 have also moved up to threaten the French conscripts in front of them.
The French cavalry B in the centre have sort of sorted themselves out now and are lined up in range to charge through the guns – but will they be brave enough to do so?
The French Hussars C on the right have decided to face up to the Prussian Hussars while the Prussian Dragoons 3 have given up on their dreams of right flank conquest realising they can’t operate that far away from their Divisional general who’s wanting to take personal command of the Hussars over on the left.
On the left, the Grenadiers 4 can’t advance against the superior numbers in front of them including the Old Guard, especially since the Horse Artillery on their right failed their test to prolong into medium range of the Guard despite the Charismatic Exceptional CinC joining them and speaking very nicely to them!
Back on the right, the small unit of Prussian veterans 5, now has a unit on Musketeers supporting their right flank but is still feeling very exposed to all the French in front of them. At this point I was feeling I was going to get rolled up on my right while my left couldn’t push forward to force the issue.
French Turn 3 and Prussian Turn 4 – Crunch Time!

I need to get better at remembering to take photos after my opponent’s move! So here again, two turns in one…
The French out-skirmished the Prussian infantry and then the Prussian cavalry failed to clear the skirmish markers despite an abundance of PIPs. With skirmish markers on all the Prussian front-line infantry, in their turn the French boldly moved into volley range on both flanks.
However, in the Prussian turn, the veteran Prussian infantry made them pay for their audacity. Large units of veterans with artillery attachments still put out 6 dice when they have a skirmish marker on them and re-roll a miss – so it’s like having 7 dice! On the left, French line infantry unit A and Guard unit C were both given 4 hits and forced to retire while Guard unit B was dropped to disorder.
On the right, the French Legere F were also given 4 hits while the unit east of them was dropped to disorder. The French Hussars H carelessly wandered into canister range (6 inches) of the Prussian Horse Artillery and were dropped to disordered.
The picture shows the situation after the Prussian move following these shooting results. The Prussian Hussars 3 charged the large French conscripts who failed their morale test and formed square, but as expected bounced the Hussars off. But this is a good example of using cavalry not to break infantry units but to force them into vulnerable squares. The Prussian Grenadiers have now moved into volley range to blast the disordered square, as have the Poor Reserve infantry 2. Not a good time to be a conscript! At the same time, the other unit of Prussian Grenadiers 1 have moved into volley range of the disordered French Old Guard unit B.
Over on the right flank, the large Prussian unit 4 has moved into volley range of the disordered French hussars. Normally this would be risking a React move charge from the cavalry but the cavalry took 3 hits from fire so can’t advance. Also on that flank, the small Prussian Veterans and Musketeers 5 have moved into volley range of the disordered French conscript unit.
The big red flash on the right is to mark the sad, sudden and unexpected demise of the Superior Prussian Hussars. This unit dutifully charged the French Hussars who had been edging round the flank and sent them off wavering. The Prussians were “only” spent and disordered and seeing a small conscript unit propping up the wing of the French army decided now was their time for glory (they obviously didn’t read the rules so didn’t realise that glory is only fleeting! :)) They successfully diced to retain control which then allows them to wheel and charge into any enemy unit within 6 inches. This enemy can’t make any reaction move or defensive fire but they must take any required morale tests. The heroic (grrr) French conscripts passed their morale test for being charged by cavalry while not in square, and then with flank support from the unit next to them, gave the Prussian Hussars 4 hits and routed them! This caused two Prussian units 5 & 7 to drop morale. Lesson: it’s not always a good idea for cavalry to charge infantry who can’t form square. Take a breath and work out the odds first!
But other than that debacle, things are looking good for the Prussians at the end of their 4th turn.
French Turn 5 and the End!

Lots of splat markers tell a sorry tale for the French. Red are for routed, yellow for wavering. Prussian volley fire has routed the Conscripts 1, the Hussars 2 and the other Conscripts 3. Each routed unit is worth 2 Army Combat Value and each wavering is worth 1. The French have therefore lost 12 ACV which is over 40% of their army. The Prussians have a routed Hussar unit and a spent Hussar unit which is 2.5 ACV – more than 10% but less than 30% so it is a Prussian win!
Post Battle Synopsis
At 14 units to 11 the French had the numbers to outflank me but they locked themselves in between two terrain pieces. Also their Guard and Cavalry divisions went down after my whole army was down so they could have placed them both on one flank to create an overwhelming flank attack. Placing them both in the centre meant they gave up their deployment sequence advantage.
Nevertheless I still felt I was going to struggle on my right if they could get their cavalry out in support. The French took a chance and closed to volley range when my troops had skirmish markers on them. On another day I may have rolled badly and it could’ve worked but we rolled slightly above average and they got knocked back. They might have been better playing the percentages and persisting with the skirmish fight which they were winning and grinding down my weaker right flank with superior numbers.
Choosing to attack was a mistake that I got away with due to my opponent’s error. That being said, if the French had moved first, they might have been able to bring their numbers to bear so it’s hard to say for sure.
On army design, an Exceptional CinC is great to have! PIPS are critical in the game so be careful sacrificing general quality for troops. The French had a Competent CinC and only 1 Skilled Divisional which made fixing his imperfect deployment tricky. Charismatic generals are also worth their weight in gold – I took 2 plus 2 BCs. Glory is about making your opponent take and fail morale tests. My opponent said one of the reasons he closed when he did was I just seemed to keep rallying so he felt he needed to do something more drastic.
And so, the Prussians ride off triumphantly into the sunset with 2 wins out of 2. No doubt their undoing is just around the next corner…