Following the Battle of Liegnitz, the Prussian and Russian forces were forced to fall back towards Breslau. However, although they were bloodied they were far from beaten and it wasn’t long before they began to push west again. At the same time the victorious French were left licking their wounds in and around Liegnitz but without the strength to maintain pressure on the Allies.
Reports are coming in of columns of French troops heading west. Having failed to achieve a decisive victory, could the Emperor be pulling back to get closer to his supply depot in Dresden and also closer to the recruiting depots? The two victories have been bloody for both sides and the Allies seem to have a stronger flow of recruits filling the gaps than the French do.
Napoleon may also be considering the reports he has been receiving of strong Austrian forces starting to appear from the south in the direction of Dresden. He risks being cut off from his supplies if this old enemy is left unchallenged.
Meanwhile up north in Berlin, residents of that city would have been relieved to have seen columns of Prussian infantry under Yorck entering the city. Rumours had been rife that the French were on the verge of taking the Prussian capital which could have been diplomatically disastrous. It appears Berlin may have been saved by the weather which slowed the young French recruits. There is also a rumour that the French have occupied Charlottenberg, southwest of the capital. Napoleon will be chuckling into his cognac when he hears that the Prussians are furious with Crown Prince Bernadotte. The Gascon was closer to Berlin than Yorck, has still failed to appear with his Swedish army, leaving it to the Prussians to do the hard marching, and now probably the hard fighting.
Will the alliance hold for long enough to drive the French out of Germany?
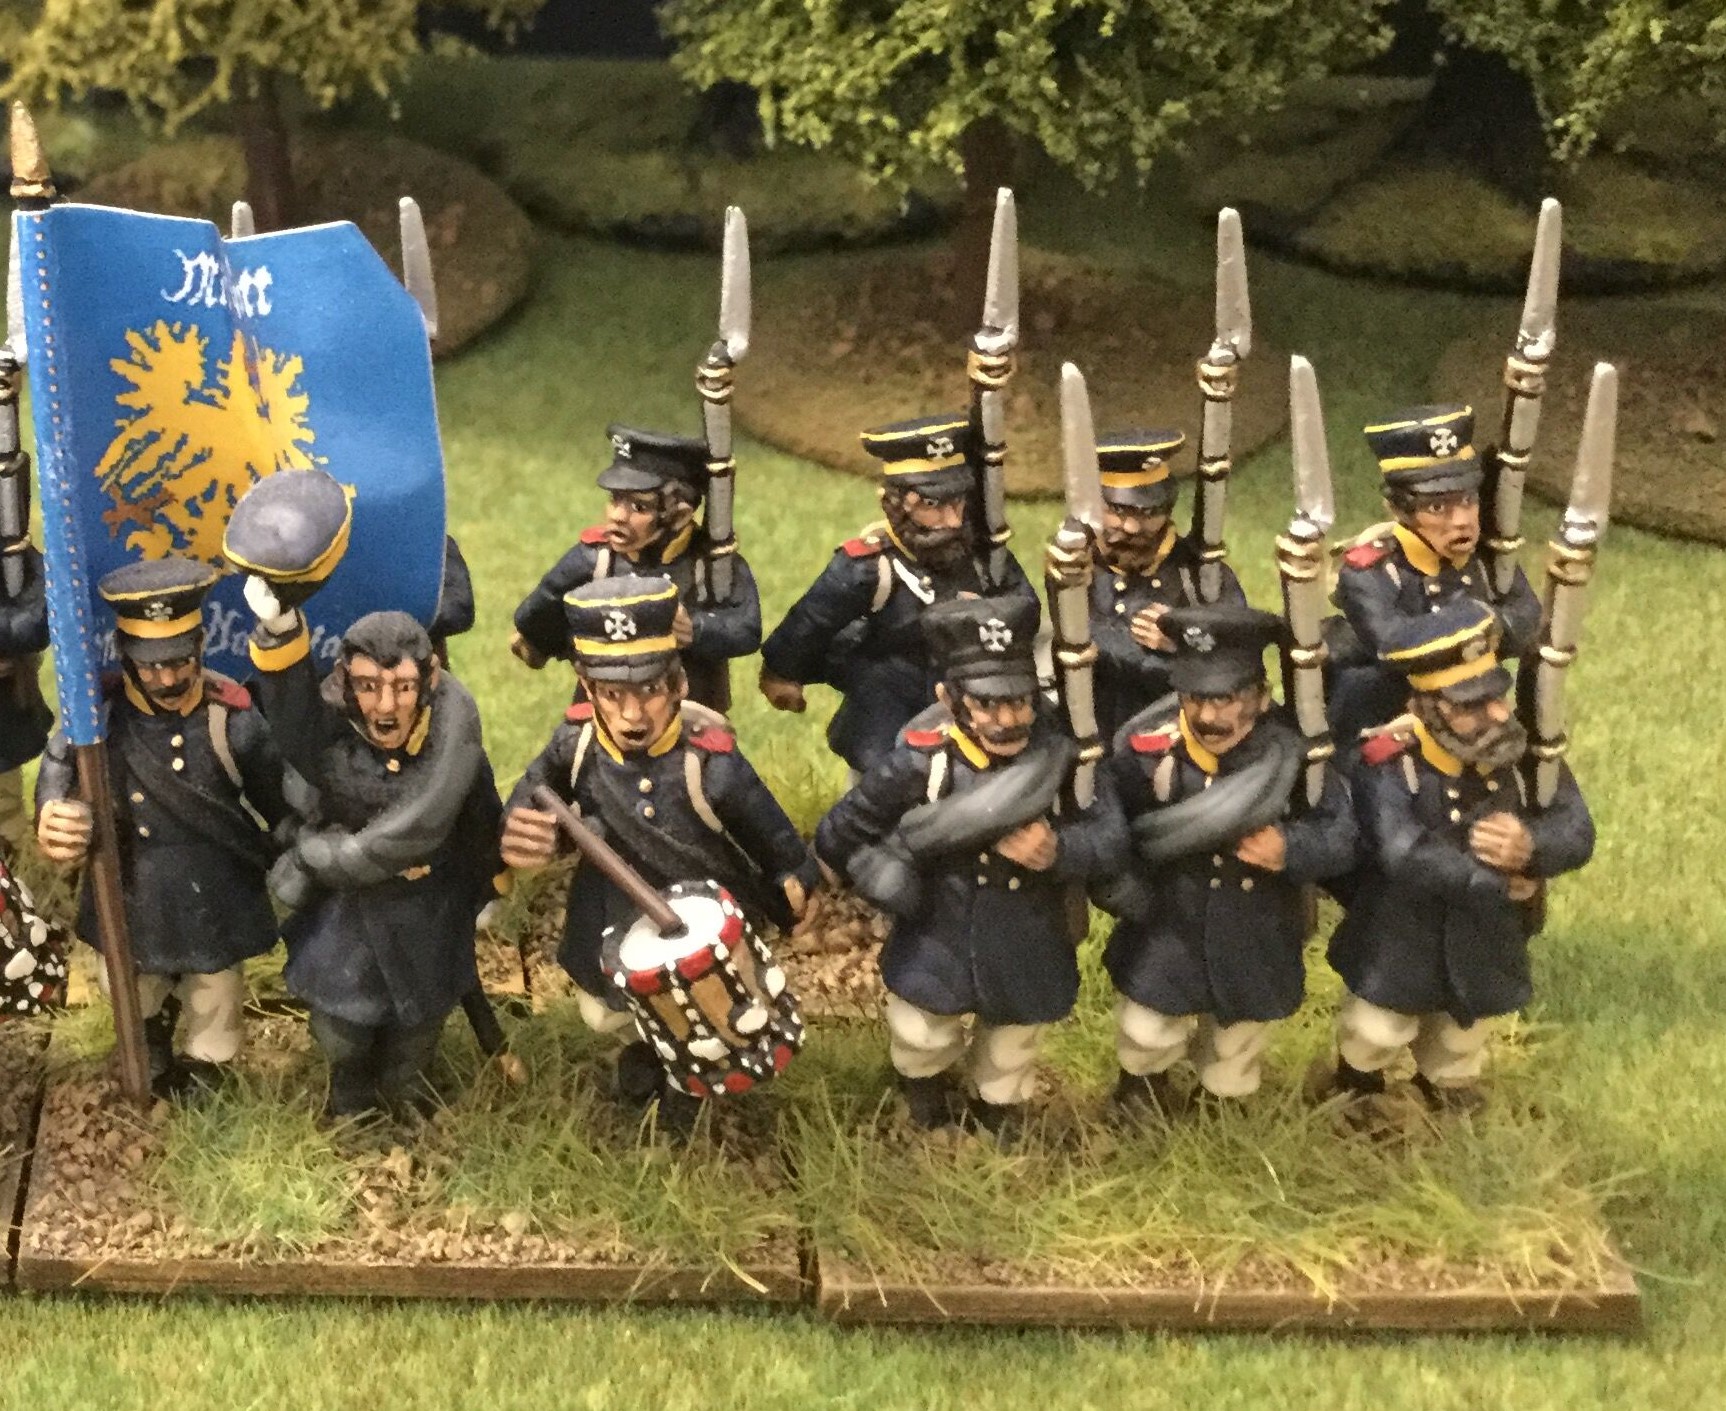
The forces of Prince Barclay de Tolly and Field Marshal Blucher combined to overwhelm the isolated corps of General Vandamme east of the town of Liegnitz in Silesia. However, the wily French general retreated in the face of superior numbers towards Liegnitz and combining with Marshal Marmont and his corps of Saxons, turned and confronted his pursuers. At the same time, both sides sent out frantic requests for support from their forces nearby. Wittgenstein for the Allies and Ney for the French responded with alacrity and arrived at the southern end of the battlefield almost simultaneously.
The battle started on the northern end of the field with an aggressive attack by Barclay’s Grenadier corps. They were met by a combination of Saxons and Bavarians. A bold charge by the Russian Grenadiers sent the first line of Saxons fleeing to the rear while a mass of Russian light cavalry forced the Bavarians into square.
Slightly south of this engagement both armies deployed powerful grand batteries that inflicted long range casualties and stymied attempts to attack from both sides. Meanwhile Blucher’s Prussians were gradually arriving on the field and threatening to punch through the French centre. However, their advance was slowed up by a large marsh in the centre of the field and it took a while for their presence to be felt.
At the same time in the south Wittgenstein’s threw in his freshly arrived divisions against Ney whose own troops were only just starting to arrive. This set off a running fight that see-sawed throughout the day. Initially the Russians attacked aggressively forcing the French onto the back foot, but as more of Ney’s forces arrived, including a division of veteran Poles, the French Marshal was able to counter-attack. The tired Russians gave ground gradually to avoid being outflanked.
Back in the north, the triumphant Russian Grenadiers now found themselves isolated as the second line of Saxons including their Guard pushed forward over the bodies of their fallen comrades and drove the Grenadiers back. The Russian cavalry on the right flank of the Grenadiers, unsupported by either infantry or artillery, were forced to retire in the face of the steady Bavarian squares.
However, south of the grand batteries, the French were starting to be overwhelmed by large numbers of Prussians. A bold charge by the Saxon Guard Cuirassiers smashed through an Allied square but was then itself forced back by the weight of numbers ahead of them.
With Barclay being driven back on their right and Wittgenstein falling back on the left, Blucher was left with no option but to pull back with them, despite his preponderance of numbers in the centre. As night fell long columns of Allied troops could be seen marching off on the road to Breslau. The French and their German allies were left holding the field, bloodied but triumphant. However, while the French had been able to defeat the Allies, once again they were unable to inflict a knock-out blow.
The Emperor had not made it to the battle, but would now be forced to assess his strategic situation. With reports to Austrian forces starting to mass in the south and threaten his lines of communication and more Russian reserves arriving from the east, will he be forced to retire or will he gamble one more time on achieving a decisive victory?
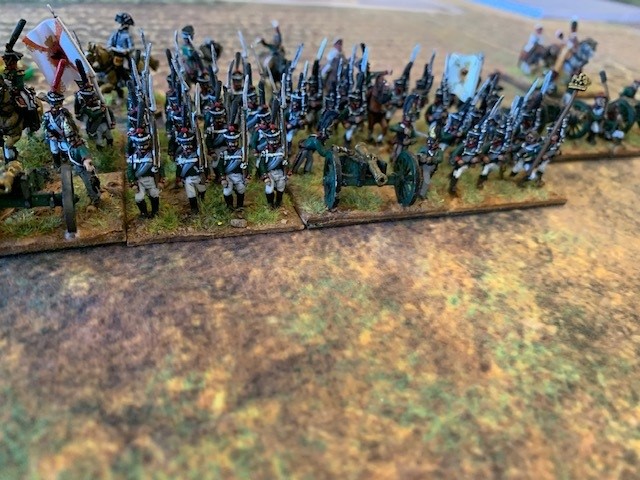
My Swedes getting their first outing. Fancy flags and yellow plumes to impress. Poor Drilled infantry – how will they perform…? A longer battle report than usual.
Swedish List (well Swedes, Prussians and Russians)
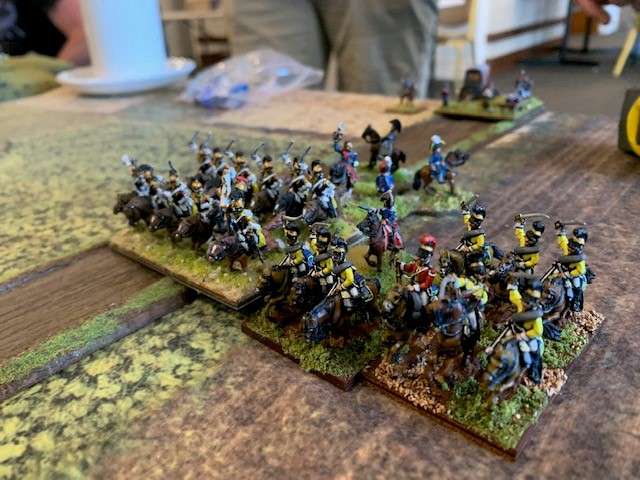
14 units including 4 large is quite a big army (63 bases). 2 large units of Poor Drilled infantry with gun and cavalry attachments are not to be sneezed at. The small unit gives them rear support which means an extra dice for morale tests for Poor. Bernadotte, our Charismatic CinC will stay close as he also adds an extra dice to morale tests. The cavalry attachments hopefully mean we won’t often have to test morale for skirmish markers. The Guard light cavalry with a brilliant commander will keep other LC honest and be available to clear enemy skirmish markers.
The small LC division is there to pester an enemy wing and draw off more points than they cost. And the enemy can’t afford to ignore large units of LC!
The Prussian Ally is the “cream” of what is a pretty average army. But again with skirmish and cavalry attachments they should be able to hold their own in most skirmish fights.
The Russian division with a large unit with a gun is there to punch someone in the nose.
The Anglo Portuguese Army
This earlier list has more average drilled troops than the 1812 British but nevertheless has some tough units. 170 points of Large Superior Veteran Light Infantry with gun and BC attachment! Wow! Very light on cavalry as you might expect for this list but this army will put out a lot of shooting! Most lists have at least 4 divisions but it’s not unusual to see only 3 in British armies. 12 units
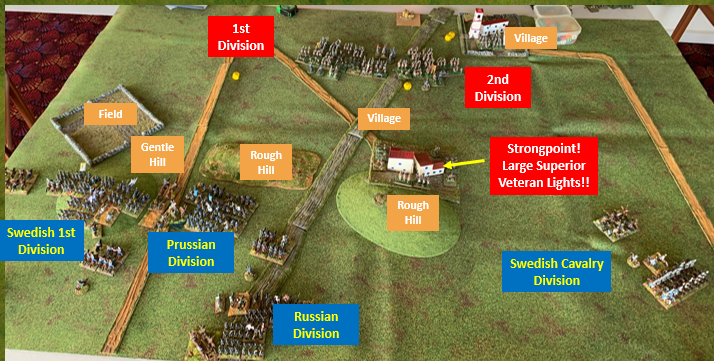
Game Set up
I chose Frontal Assault and my opponent chose Flexible Defence. I blocked 4 and thought my opponent would choose 3, hence my choice. He blocked 2 & 4 and wanted to try hidden deployment and strongpoint hence his choice of Flex Defence. One village landed perfectly for him in my centre on a rough hill. Large superior veteran lights then make it their own as a strongpoint – no-one is going to shift them out of there! Otherwise all the rough terrain and hills landed on my side so the British were left with quite an open table to defend other than the 2nd village which landed on their baseline which they were clearly going to use to anchor a flank on.
I decided to use my small cavalry division to pester him in the east while pushing the Prussians up the centre. In true Bernadotte style, the Swedish infantry were sent on the longest route so would likely come into contact last (if at all!). The Russians were put in reserve to see how things developed with the Invincibles in the village!
The British deployed their two infantry divisions centrally and fairly compactly which is a good idea when choosing strategy 1 or 2. Less experienced players will sometimes string their units out across the front making them vulnerable to being attacked piecemeal. This compact deployment gives the defender a chance to see where the attack develops and then react to it. He’s also deployed quite far back from the 16 inch deployment zone, again giving himself space to react to my attack.
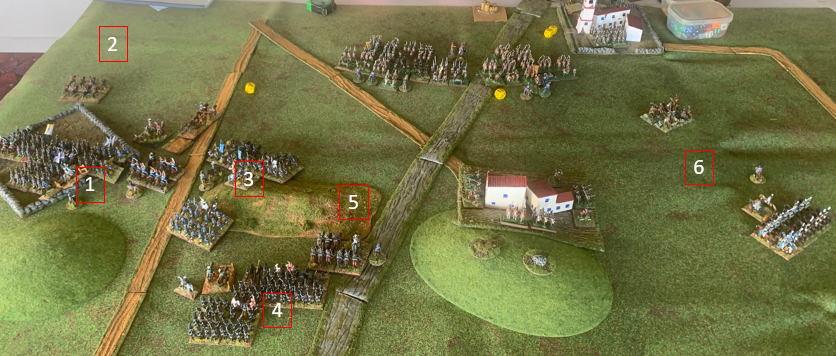
Swedish Turn 1 – Attack!
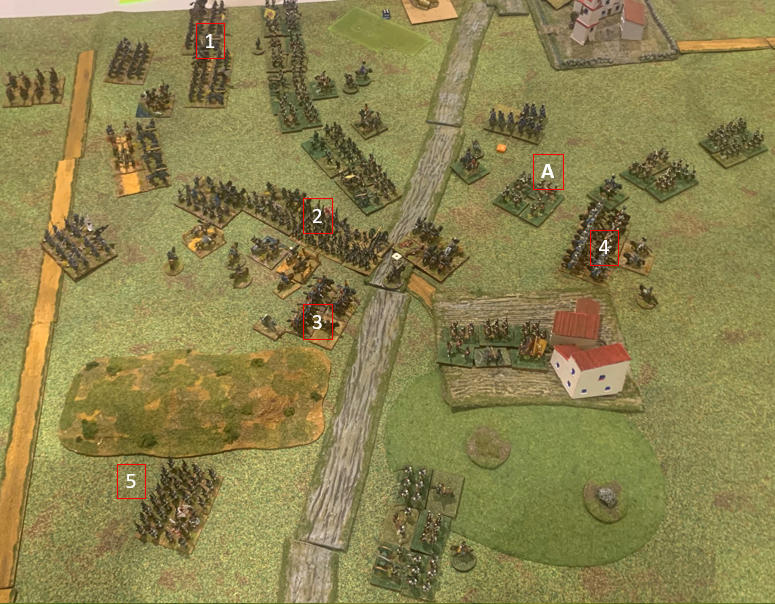
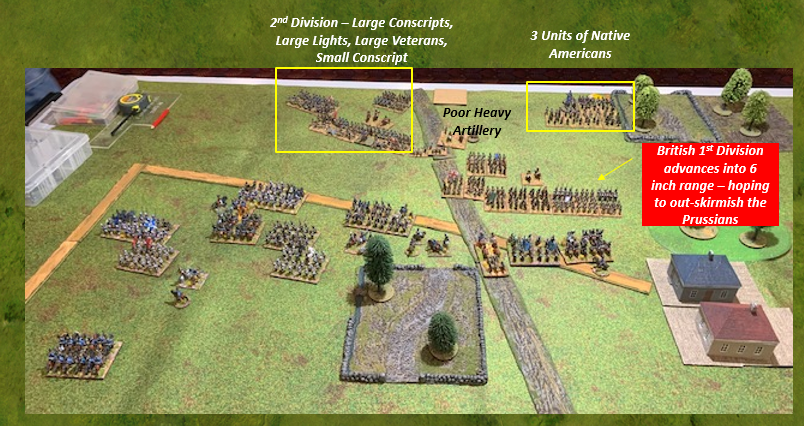
The free double move that comes with frontal assault is handy if your opponent has “blessed” you with rough terrain across your deployment area. So it might not look like we’ve made much progress but we did double move! The Swedish Infantry (1) are struggling through the field with Cossacks (2) charging ahead of them. The Prussians (3) are moving up with the large battery in the centre but keeping far enough back so the British can’t jump forward and skirmish us to death before the Swedes have come up. The Russian reserve (4) has edged forward but still isn’t sure what to do. I’m thinking the Prussian Hussars (5) with a BC are going to be very important in stopping the Invincible popping out of that village onto my flank. In the east the Cossacks (6) have moved up to be Cossacks while the large LC unit behind them is lurking, keeping an eye on the Invincibles.
British Turn 1 – The uncoiling
Their first British division (A) has sent their reserves to the west to prepare for the arrival of the Swedes (will Bernadotte let them dirty their uniforms?). The 2nd division (B) has brought their reserves out to keep my Cossacks honest and moved the Portuguese (C) out of the town. I’m surprised by this move as I only have 2 units of cavalry on that flank and clearly the weight of my attack is going to be in the west. I thought they might try and send more units west. The small cavalry division (D) has arrived in the central sector. I’ve noticed players seem to bring reserves on the centre sector 90% of the time even when the opponent is flank marching. Are surprise flank sector arrivals under-rated? The Invincibles (E) cannot move in turn one as they’re outside their deployment zone and that’s what you get for choosing flexible defence!
Swedish Turn 2
The Swedes in the west (1) have finally cleared that darn field while the large battery (2) has unlimbered. I usually prefer to unlimber just outside of 6 inches so I can then prolong into medium range in one move, but with the slowness of the Swedish advance up my left flank, I don’t want to risk the British leaping forward in their next turn when movement restrictions are over and putting skirmish markers on my guns and then charging them with 2 units. The Prussians (3) have inched forward to align with the guns while the large unit of Russians (4) have double moved forward to cover the Prussian flank while the Prussian LC (5) and the small Russian unit at the rear will need to keep the Invincibles in the town honest. In the east, the Cossacks (6) have moved into 6 inches to stop the British infantry double moving away to cover their other flank while the large cavalry unit waits for things to develop. Cavalry move quickly so there’s no need to over-commit them too soon. When in doubt, leave them in reserve.
British Turn 2
The British don’t move much on their western flank (A & B), but in the the east they decide to take a chance by moving into close range (C) of my Cossacks to clear them with volley fire. Their risk is that cavalry can take a Command Test to make a react move and charge infantry within 2 inches of them. I suspected they might do this so attached my divisional commander to the Cossacks to help pass the test (attached generals give +1 dice in CTs). However, the Cossacks clearly don’t understand Swedish. The order to charge is met with blank looks. The British cavalry (D) have shifted forward by not much. Critically in the town the Invincibles (E) failed their Command Test to change from Defending to Occupying the town. There’s an 80% chance you’ll pass a test needing one five from 4 dice (Veterans with attached BC). The covering Prussians and Russians breathe a sigh of relief.
Swedes Turn 3
A quick turn. The Swedes (1) have finally come into the line otherwise the centre (2) holds and in the east the Cossacks (3) have paid for their inability to speak Swedish and received a close range volley from the the British and Portuguese infantry and sent scurrying to the rear wavering.
British Turn 3
The Brits have sneakily pulled their line back (A & B) using a complex move to get them further away from my guns. Maybe I should have been move patient and only unlimbered the guns when they could do so just outside 6 inches…? Even a large battery can only cause limited damage at long range (it’s only a 40% chance they’ll give 2 hits). On the other flank the small British centre unit (C) has formed square in the face of my large LC unit, but it’s very clear the Brits have committed too many units over on that flank to take on 2 of my units (one of which is a wavering Cossack!). It was too much to hope that the Invincibles (D) fail their test twice. They are now Occupying the town so can jump out next turn (I kept my cavalry within 6 inches of the town to stop them double moving so they’ll have to wait until next turn before they can jump out).
Swedish Turn 4
I blunder on my left flank (1) by moving the Cossack unit into 6 inches of the British line to stop them falling back again (the Brits would need to take a Command Test to make a backward move and a Morale Test if they move back from enemy within 6 inches). Smart idea, but they’ve blocked the Swedish infantry from forming up! Grrr… we’ve had to hang one unit back a bit so it means another wasted turn while the British are over-committed on the other flank. Again the centre (2) holds while waiting for the dawdling Swedes (something historical here?). The Prussian LC (3) have moved close enough to the village that if the Invincibles emerge on this flank we’ll be able to react move into them. Will they chance their luck? Large Superior Veterans with BC vs Small Avg Drilled LC. They might be desperate enough to do it as that’s a lot of points doing nothing! In the east the wavering Cossacks (4) have pulled right back but otherwise not much has happened.
British Turn 4
The Brits have held in place on their right (A) while in the centre some dancing has been going on. A unit of Brits (B) have been moved back and sideways to make space for the Veteran KGL Hussars (C) to come through supported by the Poor Portuguese Light Dragoons. This now threaten the Prussian Hussars. The Invincibles (E) played it safe and came out of the village away from my Hussars but they’re still far from the action. Behind them, another large unit of Brits (D) is touching the village ready to enter next turn. This could turn ugly for me. If they see off my Hussars I could have 2 large units of infantry rolling up the right flank of my main line!
Swedish Turn 5
It’s been a bit pedestrian but the Swedish line (1 &2) finally moves into skirmish range of the Brits. The Hussars (3) were going to charge the British cavalry as it’s a slight advantage to initiate combat in your own bound (enemy units run in the event of an even outcome), but we are dropped to disordered by 2 hits out of 2 from the Highlander’s gun attachment! (an 11% chance of that happening). I’m a bit stumped what to do with my large hussar unit (4) in the east so they stand still. Thankfully the Prussian hussars rally at the end of the turn.
British Turn 5
The first round of skirmish fire proves the merit of cavalry attachments. Although the British have more firepower, this is soaked up by the Swedish and Prussian cavalry attachments and the net result is the large British unit (A) is left with a skirmish marker. As expected the KGL Hussars charge the Prussian Hussars (3). With their rear support they have 7 dice to our 6 dice (-1 for rear support +1 for BC). The Invincibles (C) turn and move onto our rear flank with only a lonely small Russian unit to oppose them. The large British unit (B) has now moved into the town while the British squares (D) inch towards the large LC. We fight the cavalry combat and BOOM (1)! The Prussians roll 6 hits out of 6 (a 2% likelihood!) while the KGL score only 2 hits. The KGL rout and the Prussians pursue into the Poor Portuguese LC who fail their test for seeing the rout and are dropped to wavering in the proceeding combat and forced to retire (2). My opponent’s language at this outcome is not worthy of a child friendly report like this. “Unfortunately” my Hussars are left wavering after their heroics so won’t be able to take advantage of the mayhem they have created (yet).
Swedish Turn 6
Time to drive home our advantage. On our left, the 2 large Poor units of Swedish infantry (1) advance to volley range hoping to take advantage of the skirmish marker on the large British unit. In the centre the large Russian unit with a gun and the small Prussian unit move into volley range of the Highlanders. The Swedish Guard LC (3) finally have role to play. They shift across to cover the village and threaten the Invincibles. Once again the British have to decide whether they want to exit facing our line and risk a react charge from the Guard LC. On the right, the large LC moves into close range of the British infantry who cleverly make a react move to form square. I’d forgotten they could do that! In our rear the small unit of Russian infantry are issued an extra ration of vodka and turn to face the Invincibles. Crunch time across the line!
British Turn 6
Volley fire doesn’t go quite as expected. The small British unit at the top of the pic gives my large Swedes 4 hits from 4 dice (1). This drops to 3 hits as we’re large and would normally this would drive us back to 3 inches and out of volley range to return fire. However, through a quirk of table edges, the Swedes happen to be angled with their backs against the table and so can’t be driven back and will be able to return a volley fire (albeit disordered). Their 4 dice inflict a paltry 1 hit. However, the next units along go more to plan with the Brits not causing any damage to the Swedes who drive them back to 3 inches with our return fire (2). The Highlanders have to split their fire and cause no damage and are in turn driven back wavering (3). On the right, the small square causes no damage to the large LC (4).
During the movement phase not a lot happens as most British units are under fire and not in a position to move. In the east a British square (A) moves into volley range of the large Swedish hussar unit (1) who is now going to be caught in a double cross fire from 2 squares. However, I anticipated this which is why I moved to within 2 inches last turn. I make a React move and charge the square to my front (no fire allowed at Reacting units). Not surprisingly we cause little damage to the square (or them to us) and we bounce off the square, retreating 8 inches out of the cauldron! (I was hoping I’d dice high to get out of there and I did.) In the south, the Invincibles (B) blink as they’re now threatened by the Swedish Guard LC closest to the village. Instead of running down the small Russian infantry unit, they wheel to partially face this new threat.
Swedish Turn 7 and victory!
Firing doesn’t result in anything decisive but the Russians and Prussians charge home in the centre. It’s two units into one (2) and the already disordered Loyal Lusitanian light infantry are routed. The brave but wavering Highlanders are charged by the Prussian Hussars, pass both morale tests (charged while wavering and charged by cavalry while not in square) and then fight off the cavalry. However the triumphant Russian infantry who have just dispatched the Lusitanians, pursue into the square and rout it (3), while the victorious Prussian infantry pursue into the flank of the disordered large unit of British infantry (1). That’s enough to break the British army. Swedish victory (with a little help from their friends…).
Post battle synopsis
My attack was frustratingly slow to develop due to having to get through all the heavy terrain in my deployment area. I could’ve attacked on the more open eastern flank but I figured the gap between the two villages was too easily defended by the smaller British army. I blundered in unlimbering my artillery too far back and then get my Cossacks on the left in the way of my infantry causing further delays. I think my victory can be put down less to my good tactics and more to my opponent letting too many points get tied up on the eastern flank (including 170 points of light infantry in the village who only fired one shot the whole game). The cavalry combat in the Brits 5th turn could easily have gone the other way and then my flank would’ve been ripped open and I would have had infantry emerging from the village and rolling me up. I needed to develop the attack on my left faster before my right flank crumbled but I couldn’t risk force marching Poor infantry. I would have been better served to put the Prussians on that flank and force marched them, trusting their Charismatic divisional commander plus the Charismatic Bernadotte to rally any wobbles. As the saying goes, battle are won by the general who makes the fewest mistakes and that was certainly the case here.
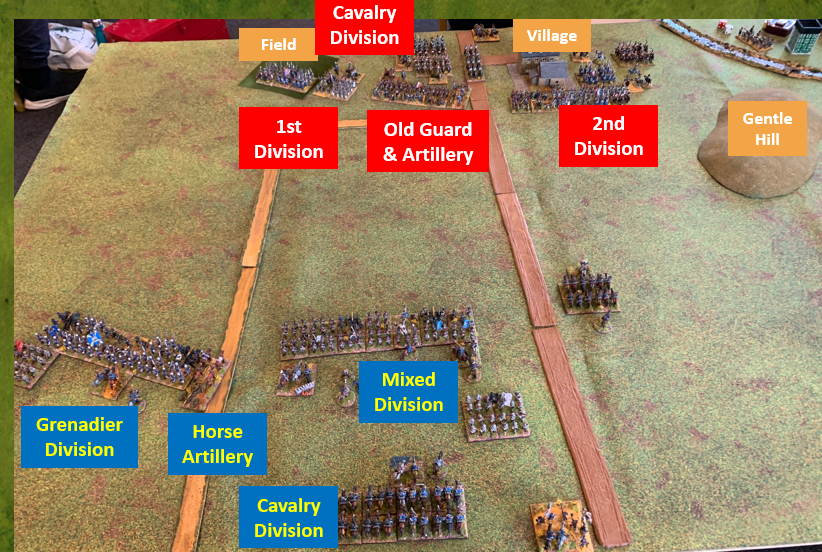
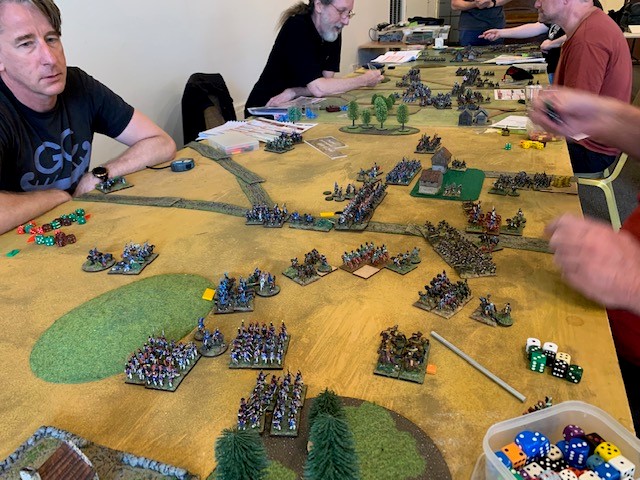
This was a game fought at the Struggle of Nations Team event at the League of Ancients in Melbourne in September 2023. 1813 Armies only – Coalition armies vs Empire armies. This battle proved to be a real clash of the titans with my Prussians fielding two units of tooled up large Grenadiers taking on my opponent’s division of Superior Veteran Old Guard!
This pic shows the terrain and initial deployment (Prussians are the blue blocks). A very open battlefield with only an enclosed field and village in the French deployment area playing any role in proceedings. We both chose Frontal Assault for our strategies. I won the subsequent dice off and chose to Attack which was a tough decision as my army is only 3 divisions and I knew his was 4 (having loaned him the figures! :)) Because the Attacker must deploy the first division when choosing Frontal Assault this meant he would still have 2 divisions to deploy when I’d already put my whole army down. But I wanted to move first. Time would tell if this was a wise decision or not.
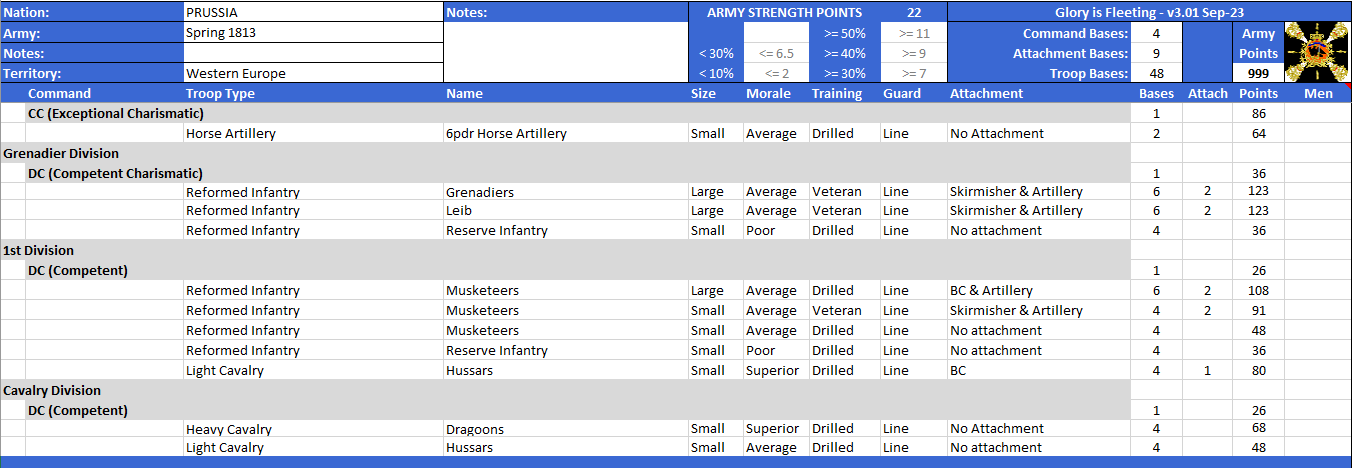
French Army list – 242 points in 2 units of Old Guard!
There’s a small anomaly in the points here as Veteran artillery attachments are now a thing of the past.
Prussian Army list – 246 points in 2 Large units of Grenadiers!
Prussian Turn 1
The Grenadiers 1 have force marched on the left (i.e. triple moved). The left hand unit wobbled in their morale check but their Charismatic general gave them a good talking to and they rallied in the End Phase. Why the Force March? We want to pin the French in place as they seem to have hemmed themselves into a narrow space between the village and the field and we might be able to stop them getting their cavalry into action. The Poor Reserve infantry2 are moving up behind the Veterans but force marching isn’t for Poor troops! The French flank looks potentially open on that side. Maybe the Reserve infantry can take advantage?
Over on the right, the Superior Hussars3 have moved forward to slow down the French advance on that flank, while the 1st Division4 in the centre is holding back slightly to see what the Old Guard do. The Horse Artillery5 didn’t need to force march as their extra movement distance allows them to almost keep up with the Force Marching Grenadiers.
Meanwhile a unit of Hussars 6 from the Cavalry Division has moved up in support of the Grenadiers to help with skirmisher clearing while the Superior Dragoons 7 are waiting in reserve at the back.y
French Turn 1
A wide angle view of the battlefield to be able to show a unit of pesky French hussars circled in red who have double moved to threaten the Prussian right flank. Their 2nd Divisioninfantry A have pushed up into the face of my Hussars but with only a single gun attachment in that force, should we be worried? That being said, that looks like a lot of French bearing down on my open right flank!
The Old GuardB have advanced in the centre to bring one Prussian Grenadier unit into range of both their units. However, the French 1st DivisionC seems a bit unsure what to do and is holding back (maybe feeling the threat of those awesome Poor Prussian Reserve infantry loitering out on my left?).
The French cavalry Division D are feeling the pressure of the confined space they’ve been deployed in and haven’t really moved. The unit in column on the road getting in the way of the heavy artillery who are trying to deploy. (I seldom find deploying in column worthwhile as the movement bonus on road is usually lost in the time it takes to change formation).
Prussian Turn 2
The Grenadiers 1 took some skirmish hits from the Old Guard but these were cleared by the Hussars. They’ve decided not to advance alone against the Old Guard so instead shifted a base to the right to bring both units in shooting range of the Guard. The Poor Reserve infantry 2 have double moved up the left flank. They don’t want to get too far forward but could potentially draw off a French unit.
The horse artillery 3 have unlimbered in front of the Guard.
The large unit 4 with Artillery and Brilliant Commander are facing up against the Old Guard and the French Heavy Battery in the centre while the small unit of Veterans on their right are bravely facing off against the entire French 2nd Division. The Prussian Hussars 5 on the right passed a Command Test to move away from the French infantry (which also requires a morale test as you’re retreating from enemy within 6 inches – but we passed that too!) A unit of Prussian Musketeers 6 can be seen moving to the right as well to prop up that exposed flank. The unit of Poor Reserve infantry 7 on that flank are loitering to the rear, a good place for Poor infantry!
The Prussian Dragoons 8 have wheeled to the right flank too. Potentially with 2 cavalry units to one, we can overwhelm the French hussars and turn that flank too while the French cavalry are stuck at the back? However, my Cavalry Division is horribly stretched with one unit on either flank and only a Competent commander to control them. Perhaps I’m being too ambitious…
French Turn 2 and Prussian Turn 3
The battle line is starting to take shape! The French 1st division A finally realised it needed to come out of the field, perhaps under encouragement from the French Guard who fancied some support. This has left their flank exposed to the Prussian Reserve infantry 1 who’ve double moved around the open flank. Even Poor troops don’t mind fighting against a flank! The Prussian hussars 2 have also moved up to threaten the French conscripts in front of them.
The French cavalry B in the centre have sort of sorted themselves out now and are lined up in range to charge through the guns – but will they be brave enough to do so?
The French Hussars C on the right have decided to face up to the Prussian Hussars while the Prussian Dragoons 3 have given up on their dreams of right flank conquest realising they can’t operate that far away from their Divisional general who’s wanting to take personal command of the Hussars over on the left.
On the left, the Grenadiers 4 can’t advance against the superior numbers in front of them including the Old Guard, especially since the Horse Artillery on their right failed their test to prolong into medium range of the Guard despite the Charismatic Exceptional CinC joining them and speaking very nicely to them!
Back on the right, the small unit of Prussian veterans 5, now has a unit on Musketeers supporting their right flank but is still feeling very exposed to all the French in front of them. At this point I was feeling I was going to get rolled up on my right while my left couldn’t push forward to force the issue.
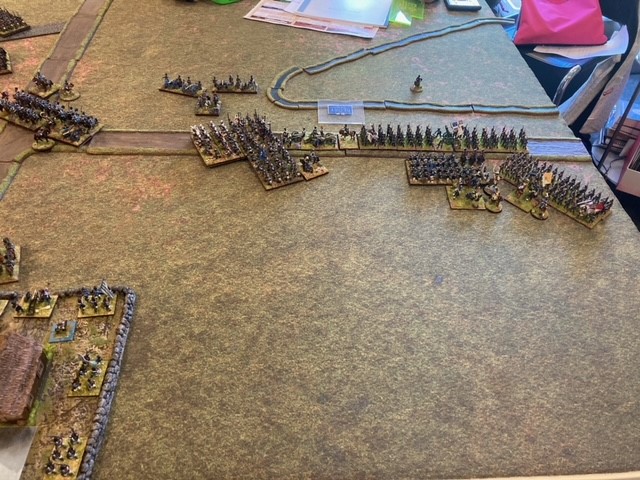
French Turn 3 and Prussian Turn 4 – Crunch Time!
I need to get better at remembering to take photos after my opponent’s move! So here again, two turns in one…
The French out-skirmished the Prussian infantry and then the Prussian cavalry failed to clear the skirmish markers despite an abundance of PIPs. With skirmish markers on all the Prussian front-line infantry, in their turn the French boldly moved into volley range on both flanks.
However, in the Prussian turn, the veteran Prussian infantry made them pay for their audacity. Large units of veterans with artillery attachments still put out 6 dice when they have a skirmish marker on them and re-roll a miss – so it’s like having 7 dice! On the left, French line infantry unit A and Guard unit C were both given 4 hits and forced to retire while Guard unit B was dropped to disorder.
On the right, the French Legere F were also given 4 hits while the unit east of them was dropped to disorder. The French Hussars H carelessly wandered into canister range (6 inches) of the Prussian Horse Artillery and were dropped to disordered.
The picture shows the situation after the Prussian move following these shooting results. The Prussian Hussars 3 charged the large French conscripts who failed their morale test and formed square, but as expected bounced the Hussars off. But this is a good example of using cavalry not to break infantry units but to force them into vulnerable squares. The Prussian Grenadiers have now moved into volley range to blast the disordered square, as have the Poor Reserve infantry 2. Not a good time to be a conscript! At the same time, the other unit of Prussian Grenadiers 1 have moved into volley range of the disordered French Old Guard unit B.
Over on the right flank, the large Prussian unit 4 has moved into volley range of the disordered French hussars. Normally this would be risking a React move charge from the cavalry but the cavalry took 3 hits from fire so can’t advance. Also on that flank, the small Prussian Veterans and Musketeers 5 have moved into volley range of the disordered French conscript unit.
The big red flash on the right is to mark the sad, sudden and unexpected demise of the Superior Prussian Hussars. This unit dutifully charged the French Hussars who had been edging round the flank and sent them off wavering. The Prussians were “only” spent and disordered and seeing a small conscript unit propping up the wing of the French army decided now was their time for glory (they obviously didn’t read the rules so didn’t realise that glory is only fleeting! :)) They successfully diced to retain control which then allows them to wheel and charge into any enemy unit within 6 inches. This enemy can’t make any reaction move or defensive fire but they must take any required morale tests. The heroic (grrr) French conscripts passed their morale test for being charged by cavalry while not in square, and then with flank support from the unit next to them, gave the Prussian Hussars 4 hits and routed them! This caused two Prussian units 5 & 7 to drop morale. Lesson: it’s not always a good idea for cavalry to charge infantry who can’t form square. Take a breath and work out the odds first!
But other than that debacle, things are looking good for the Prussians at the end of their 4th turn.
French Turn 5 and the End!
Lots of splat markers tell a sorry tale for the French. Red are for routed, yellow for wavering. Prussian volley fire has routed the Conscripts 1, the Hussars 2 and the other Conscripts 3. Each routed unit is worth 2 Army Combat Value and each wavering is worth 1. The French have therefore lost 12 ACV which is over 40% of their army. The Prussians have a routed Hussar unit and a spent Hussar unit which is 2.5 ACV – more than 10% but less than 30% so it is a Prussian win!
Post Battle Synopsis
At 14 units to 11 the French had the numbers to outflank me but they locked themselves in between two terrain pieces. Also their Guard and Cavalry divisions went down after my whole army was down so they could have placed them both on one flank to create an overwhelming flank attack. Placing them both in the centre meant they gave up their deployment sequence advantage.
Nevertheless I still felt I was going to struggle on my right if they could get their cavalry out in support. The French took a chance and closed to volley range when my troops had skirmish markers on them. On another day I may have rolled badly and it could’ve worked but we rolled slightly above average and they got knocked back. They might have been better playing the percentages and persisting with the skirmish fight which they were winning and grinding down my weaker right flank with superior numbers.
Choosing to attack was a mistake that I got away with due to my opponent’s error. That being said, if the French had moved first, they might have been able to bring their numbers to bear so it’s hard to say for sure.
On army design, an Exceptional CinC is great to have! PIPS are critical in the game so be careful sacrificing general quality for troops. The French had a Competent CinC and only 1 Skilled Divisional which made fixing his imperfect deployment tricky. Charismatic generals are also worth their weight in gold – I took 2 plus 2 BCs. Glory is about making your opponent take and fail morale tests. My opponent said one of the reasons he closed when he did was I just seemed to keep rallying so he felt he needed to do something more drastic.
And so, the Prussians ride off triumphantly into the sunset with 2 wins out of 2. No doubt their undoing is just around the next corner…
Two very different style of army list that we both chose:
Strategies, Terrain and deployment
• Prussian Exceptional CinC blocked strategies 4, 5 & 6 and British Skilled CinC blocked 3 & 4.
• British chose Probe and Prussians chose Frontal Assault – perhaps the best strategy against Probe!
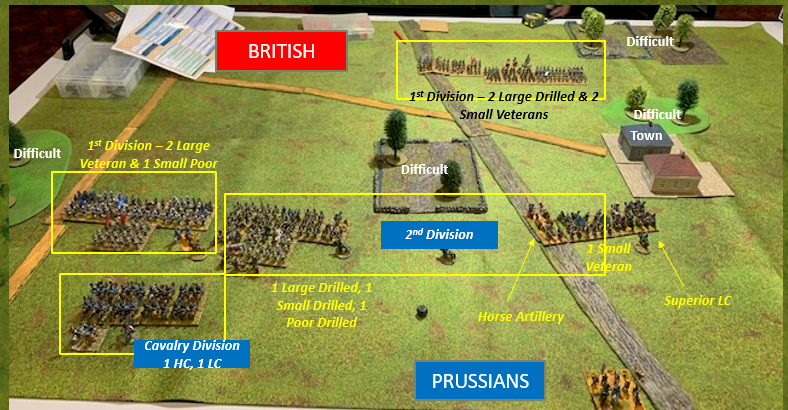
• The British went for maximum terrain. They tried for a river but the better Prussian CinC was able to remove it as the Brits rolled a 1 for length.
• There is quite a bit of open ground to fight on although the Prussians have been forced to split their army due to the wood in the centre.
Prussian Turn One
British Turn One
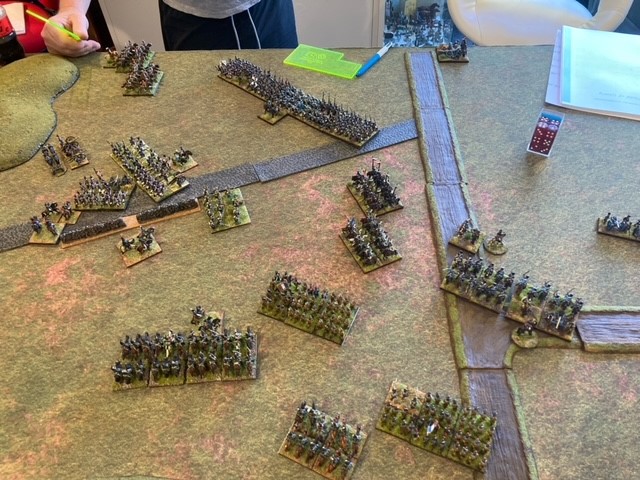
The British diced successfully for their 2 reinforcement divisions to arrive and have forced marched one of them on to arrive the same turn they tested to arrive – a Division of Native Americans! Their reserve division of 4 more infantry units also arrives. All arrivals come on the central sector.
Prussian Turn Two
British Turn 2 & Prussian Turn 3 (yes I forgot to take a photo after the British 2nd turn!)
In their 2nd turn the British moved into skirmish range (6 inches) with the net result being the British large unit on the eastern flank ended up with a skirmish hit.
British Turn 3
Prussian Turn 4
British Turn 4 – and they break!
Post Battle Review
• Glory is Fleeting games typically last 6-7 turns +/- 3hours. This one was very quick – 4 turns in 2 hours!
• Due to the speed of their attack, the Prussians were able to mass on their left and had nearly a 50% points advantage over the British.
• Large units of Veterans with Guns and Skirmish attachments are awesome! And so they should be at 123 points!
• Probe is a risky choice if your opponent can take Frontal Assault. The British were lucky that all their off table divisions diced successfully to arrive in turn 1. It could have been even uglier had they only arrived in turn 2 or 3.
• At the moment small hard hitting armies of good troops are ruling the roost in Glory is Fleeting. Who will come up with counter to this…?
Prussian and Russian forces combined today in a major battle at Goerlitz in eastern Saxony. On the southern end of the field, Barclay de Tolly pummeled the Saxons and Bavarians with massed artillery followed by a charge of the Grenadiers that drove the French allies back in precipitate retreat.
Immediately to the north of this encounter Wittgenstein was confronted by Bertrand. A bloody see saw cavalry fight ensued that at first looked like it was going the way of the French but some brave resistance from the Russians led to the green French troops starting to waiver. Only the intervention of Napoleon himself saw the French in this sector finally prevail, and as night fell the tired French conscripts were relieved to see the defeated Russians retreating in disorder.
In the centre of the field, Marshal Ney faced off against Miloradovich in a battle that was slower to develop. The Russian general held his ground and challenged the impetuous French marshal to dig him out of a strong position. After much maneuvering and counter moves, Ney was reinforced by a division of Guard cavalry that had force marched to the battlefield, and was able to force a breakthrough and drive the Russian troops back until they eventually broke.
In the northern end of the long battlefield, the campaign was decided where the Prussians under Blucher were soundly beaten by General Vandamme. The battle in this sector of the field seemed to be in the balance until the arrival of the Old Guard who had been marching all night to get to the field in time. Blucher’s conscripts fought bravely but a determined assault by the Guard punched a whole in the Prussian centre which, supported by an attack on the left, rolled up the Prussian line.
Despite Barclay’s victory in the southern sector, it was clear to the Allied commanders that they had suffered a grievous loss. Napoleon still had a strong force of cavalry to hand and these kept up the pressure on the retreating allies, not allowing them to regroup. Hearing of this victory in the east, Schwarzenberg’s Austrians prudently withdrew southwards.
The Allies had been unable to achieve a significant victory over the French but had suffered a number of defeats, culminating in a major defeat at Goerlitz.
With Berlin seemingly under siege by Marshal Oudinot and the Russians and Prussians in retreat in the east, the Austrians have announced their intention to seek terms from Napoleon. At the same time, the Tsar has ordered his forces to withdraw across the Niemen to regroup which while not constituting a request for terms has effectively left the Prussians isolated. The King of Prussian has accordingly sent emissaries to the French Emperor. Celebrations have been ordered across France and a victory parade through the capital is being planned. It would appear Napoleon’s throne is once again secure.
After failing to inflict a knock out blow on the Allies at the Battle of Liegnitz, Napoleon ordered the army to retreat on Bautzen. The Allies were quick to grasp the new situation and gave chase with the impetuous Field Marshal Blucher leading the way.
General Vandamme is rumoured to have threatened to challenge both Ney and Marmont to duels for abandoning him at the river Quiess where he was almost overwhelmed by three Allied forces. The wily French general was able to extricate himself but for some reason headed south towards Lauban and not east to Goerlitz where the rest of the army had retreated to. For a while it looked as if he was going to be surrounded by converging Allied armies. Fortunately for him, General Bertrand had spotted an opportunity to inflict a bloody nose on Osten-Sacken’s isolated cavalry corps which was near Lauban and so had also marched on that town. Two concurrent battles were fought at Lauban as described below.
Cavalry encounter west of Lauban
General Osten-Sacken stumbled into Bertand’s cavalry corps and realised he would not be able to extricate himself without a battle. Slightly to the east, Wittgenstein promised to send him the Russian Guard cavalry division, but nevertheless it was with much trepidation that the cautious Russian general gave battle. He started by throwing out a strong screen of Cossacks to slow the French advance.
Bertrand ordered his artillery forward to drive off the Cossacks. On the French left, artillery attachments fire in bombardment and close range fire to drop the Cossack twice. Accurate fire from the French guns completely disrupted the Cossacks and seeing this the French charged with two divisions of cavalry.
The Cossacks fled in the face of this combined arms assault, exposing the advancing Russian hussars who suddenly found themselves faced by French heavy and light cavalry. To make matters worse they were thrown into disorder by the retreating Cossacks. The French cavalry made short work of this second Russian line who were soon fleeing to the rear. Osten-Sacken realised the battle was lost barely an hour after it had begun and sounded the retreat, using all his powers of persuasion to rally enough Cossacks to cover his retreating force. For the second time in two weeks the dispirited Russian troopers found themselves in headlong retreat after a bloody encounter with the French.
Blucher & Wittgenstein corner Vandamme
Meanwhile at Lauban, Blucher had aggressively pursued Vandamme and forced him to give battle. In turning to face Blucher advancing from the north, Vandamme also unwittingly exposed his flank to Wittgenstein commanding the Russian Guard advancing from the east.
Both sides deployed their artillery to open the battle with long range bombardments. Blucher took up position on a dominating hill in the centre of the action personally directing his grand battery of guns with strong wings of redoubtable Prussian infantry on each side, most being recent recruits. The bulk of the cavalry were deployed to their left except for a unit of the elite Lieb Hussars which were positioned on the right. The French likewise deployed the bulk of their foot to either side of their guns with their cavalry in reserve in the centre. A brigade of conscripts held the village to their right.
The Prussians opened with a great volley of shot that forced the heavy French guns back and continued to pressure them throughout the battle. While the French guns replied, they concentrated on the Prussian right.
Vandamme ordered his cavalry forward to attack the battered Prussian right. However no sooner had these troopers begun their advance when the Russian Guard began to appear on the French left. In a bold attempt to force victory against the odds, the French cavalry, charge the Russian Guard. However the Guard held steady and a charge by the Prussian Lieb Hussars was enough to send the French cavalry reeling backwards.
The arrival of the Russians gave the green Prussian troops new heart and they charged forward into the reeling French lines. Vandamme, realizing the battle was lost gave orders to retreat. What started as a orderly retreat soon dissolved into panic as the Prussian cavalry pursued the fleeing French conscripts mercilessly. Only the arrival of the victorious Bertrand and his cavalry corps fresh from their victory only a mile away saved Vandamme’s corps from annihilation.
Following his bloody victory at Liegnitz and on the back of reports of Austrian forces threatening to cut his lines of supply around Bautzen, Napoleon has ordered his forces to fall back west.
The Allies, bloodied but unbowed have pursued them with vigour and a number of skirmishers were fought between the respective rear and advance guards but the French were able to withdraw in good order. Vandamme reportedly has challenged both Marmont and Ney to duels for failing to support him as agreed. Vandamme turned to stand and fight at Bunzlanu on the Bober river against the combined Russo-Prussian forces pursuing him, believing he had the support of the two French Marshals. Instead he found himself desperately holding off a force three times his size and was saved only by the strong position he had taken on the river, while Ney and Marmont had instead continued their retreat west to Goerlitz. Vandamme finally managed to extricate himself and fell back south west towards Lauban, hotly pursued by Field Marshal Blucher.
Further west General Lauriston has been playing a cat and mouse game with the Austrians south of Bautzen. Latecomers to the campaign, the Austrians have been very tentative in their advance. However, their presence was suddenly very apparent when they briefly cut the French lines of communication east of Bautzen. Schwarzenberg’s triumph was short-lived however as he found himself confronted by Napoleon with the Guard arriving from the east and Lauriston advancing on him from Bautzen in the west. Suddenly the Austrians showed that they can actually move at pace and they very quickly scuttled away south with the Guard in hot pursuit.
Meanwhile in the north on 27 August a desperate battle was fought just outside Berlin at Charlottenberg. On the 25th Oudinot had almost managed to get past Yorck and Bernadotte to seize Berlin but a rapid counter-march by the Prussians had saved the day. Yorck then advanced out of the city to fight Oudinot. The French general was happy to give battle having discounted the risk of Bernadotte coming to Yorck’s aid. However, the Crown Prince surprised everyone by actually getting to the battle on time. While Oudinot was able to inflict a bloody nose on the Prussians with a bold attack on his left wing, he was horrified when he learned that the dust clouds to his right was the arrival of the Swedes. A desperate fight ensued and the brave French with their allies were able to hold off the Swedes for long enough before nightfall allowed them to slip away, tactically triumphant but strategically relieved they had avoided being completely overwhelmed.
Below is the battle report from Oudinot that he sent to the Emperor.
“The terrain was sparse with a stream on the Prussian left. He deployed giving nothing away , a large infantry Division on each flank , guns and cavalry in the centre. I opted to hold the bases line village with my Bavarians and attack with everyone else down my left flank ,thinking the stream would slow any redeployment
My left launches against his withheld right. Two French Light Cvalary on the flank, guns, then infantry . Two large conscripts hold the centre advancing to fix his Dragoons while the Bavarian light cavalry help out.
Then I see dust on my right! Ah ,here comes his 4th Division was my first assumption. This force is is slowed through the stream, while my left pushes. I pin their right with my cavalry as he was cunningly falling his line back to buy time. My guns unlimber while he brings up cavalry to threaten my infantry attack .
How I see the enemy reinforcements starting to arrive. Wait, they’re not Prussians! A Swedish Division arrives on my right. The treacherous Bernadotte has force marched to attack me! The Swedish infantry advance towards the Bavarians in the town , the Swedish Guard and artillery march down the road, aiming at my centre . I’m still thinking I can win this, but then I see more dust – there are still more Swedes arriving!
I throw in my reserves against the Prussians to try and finish them off before the Swedes numbers start to count. My attack develops on my left with my cavalry charging a disordered square however it doesn’t go well. His square wavers but holds, and the French cavalry are bounced.
Meanwhile the French dragoons rout the Prussian hussars in the centre but then charge after them uncontrolled! He charges my Dragoons with his Landwehr cavalry and the Dragoons are driven back.
Another Division of Swedes arrives! Swedish Guard Light Cavalry , Prussian Heavy Cavalry and Russian infantry. And I can still see more dust! I realise then that it must be the whole Swedish army!
His large Swedish battery deploys in the centre next to a Prussian battery, ta grand battery of 40 or so guns . The French conscripts are wilting under this fire just as the Prussian infantry are forcing past the town towards them
But at last the Prussian right breaks from French volley fire just as night is falling and more enemy are pouring onto the right flank. The French are able to disengage and fall back to the West . The Prussians are mauled, the French are retreating and typically Bernadotte is left holding the field without a scratch on his precious Swedes!” End of Report from Oudinot
The eastern part of the theatre continues to be where the fighting is. Marshal Django Blucher, after a slow start has joined forces with Andrew Barclay de Tolly’s Russians and pursued (been drawn in by?) General Stubbs/Vandamme’s retreating corps to Liegnitz. Here Vandamme has met up with Marshal Mark Marmont’s corps of Saxons and the French force has turned to give battle. As with the battle of Goldberg two days ago, the armies on the battlefield are hoping to be joined by reinforcements through the day. But will the men be able to march fast enough after their bruising at the previous battle?
Meanwhile, further west, reports of clashes between Austrian and French scouts south a Bautzen are being reported. The Austrians have been slow to join the campaign but might they now be threatening to cut the French lifeline back to Dresden. The Emperor has gambled everything on a knock out blow in the east. His supporters will be hoping he achieves it this time.
In the northern theatre, carriages packed with precious belongings and family members are said to be streaming out of Berlin as the rumour-mongers create panic with reports of a French force about to descend on the capital. General Tyler Yorcke and Crown Prince Jael Bernadotte have been tasked with holding the Prussian capital so how can this be true? Could the French have stolen a march on them?
The next report will cover the outcome of the Battle of Liegnitz.
With the summer armistice ending on 18 August, Napoleon wasted no time in launching his rejuvenated forces at the Allies, precipitating the first battle of the autumn campaign just outside Goldberg, east of Bresalu and close to the Silesian border.
The Allied commanders had been hoping to use their superior numbers to isolate and destroy a French corps and at first this appeared to be what they had achieved with Dumoustier commanding the French Guard finding himself facing the combined forces of Wittgenstein and Osten-Sacken. However, according to the official bulletin sent back to Paris, this was all part of the French Emperor’s master plan. Not long after the first shots were fired, the advance division of Betrand’s cavalry corps began to arrive on the Allied right flank forcing a realignment of Osten-Sacken’s cavalry corps. What resulted was a mighty cavalry conflict that initially looked like a bad match up for the French as their lead units were all green units of light cavalry facing a strong force of Russian heavies. However, the French heavies weren’t far behind and gradually their quality and numbers started to tell (not to mention their better dice rolls!).
Meanwhile in the centre, Dumoustier was under strict instructions not to lose his Guard in the first battle of the campaign and the French commander uncharacteristically hung back waiting for his opponent Bennigsen to initiate matters in the centre. For his part, Bennigsen knew Wittgenstein wasn’t far away from descending on the exposed French right so refused to commit in the centre. Instead he pushed aggressively against the French right supported by a grand battery that battered the French Guard artillery who were forced to retire and redeploy further back. To defend his right, Dumoustier used his Guard cavalry to fight a delaying action. The green but enthusiastic troopers of the Gardes d’Honor supported by the Big Boots of Grenadiers a Cheval fought valiantly to stem the Russian advance.
It wasn’t long before Allied reinforcements began to arrive in the form of Wittgenstein’s corps. Leading the way with his cavalry division, this force combined with Bennigsen’s flank attack to send the French Guard cavalry into retreat and the French Guard were in danger of being rolled up from the right.
It was at this moment that the lead units of Ney’s corps began to trickle onto the field on the French rights and behind the victorious Russian cavalry. Napoleon had sent Ney urgent orders to force march to the sound of the guns and uncharacteristically this commander had done exactly what he was told and arrived in the nick of time. More typically of him though he arrived on the wrong road. Instead of arriving on the rear flank of the Allied army where he could have cut off their retreat, he arrived closer to Dumoustier which had the immediate effect of relieving the pressure on the French Guard but meant the Allied line of retreat was left clear.
Seeing these reinforcements arriving and the cavalry fight on their right flank going against them, the Allied commanders conferred and agreed to break off the combat. As night began to fall, columns of Russian infantry could be seen retreating into the dark protected by a screen of ever present Cossacks. Bertrand pushed his victorious cavalry to mount an aggressive pursuit, but the exhausted, green troopers soon lost touch with the Russians in the dark.
Most of the casualties fell to the cavalry on both sides, but these were losses the Allies could better afford than the French.